Table of Contents
[TOC]
蓝绿部署
什么是蓝绿部署
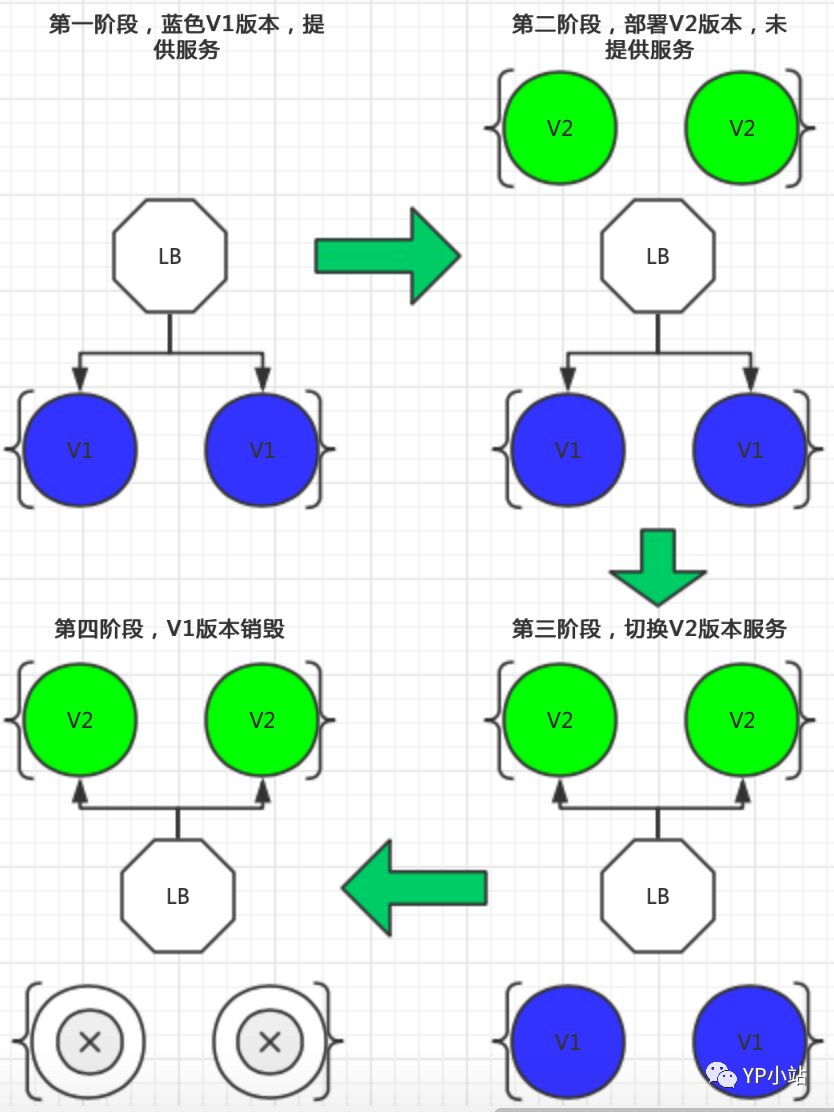
蓝绿(blue/green):新版本与旧版本一起存在,然后切换流量
蓝绿部署流程图

K8S中如何实现蓝绿部署
- 通过k8s service label标签来实现蓝绿发布
- 通过Ingress 控制器来实现蓝绿发布
- 通过Istio来实现蓝绿发布,或者像Istio类似的服务
k8s 蓝绿 yaml 配置
service.yaml 文件
apiVersion: v1
kind: Service
metadata:
  name: demo
  namespace: default
  labels:
    app: demo
spec:
  ports:
    - port: 80
      targetPort: http
      protocol: TCP
      name: http
  # 注意这里我们匹配 app 和 version 标签,当要切换流量的时候,我们更新 version 标签的值,比如:v2
  selector:
    app: demo
    version: v1
蓝 v1-deploy.yaml 文件
apiVersion: apps/v1
kind: Deployment
metadata:
  name: demo1-deployment
  namespace: default
  labels:
    app: demo
    version: v1
spec:
  replicas: 1
  revisionHistoryLimit: 3
  strategy:
    rollingUpdate:
      maxSurge: 30%
      maxUnavailable: 30%
  selector:
    matchLabels:
      app: demo
      version: v1
  template:
    metadata:
      labels:
        app: demo
        version: v1
    spec:
      containers:
      - name: demo1
        image: mritd/demo
        livenessProbe:
          httpGet:
            path: /
            port: 80
            scheme: HTTP
          initialDelaySeconds: 30
          timeoutSeconds: 5
          periodSeconds: 30
          successThreshold: 1
          failureThreshold: 5
        readinessProbe:
          httpGet:
            path: /
            port: 80
            scheme: HTTP
          initialDelaySeconds: 30
          timeoutSeconds: 5
          periodSeconds: 10
          successThreshold: 1
          failureThreshold: 5
        ports:
          - name: http
            containerPort: 80
            protocol: TCP
绿 v2-deploy.yaml
apiVersion: apps/v1
kind: Deployment
metadata:
  name: demo2-deployment
  namespace: default
  labels:
    app: demo
    version: v2
spec:
  replicas: 1
  revisionHistoryLimit: 3
  strategy:
    rollingUpdate:
      maxSurge: 30%
      maxUnavailable: 30%
  selector:
    matchLabels:
      app: demo
      version: v2
  template:
    metadata:
      labels:
        app: demo
        version: v2
    spec:
      containers:
      - name: demo2
        image: mritd/demo
        livenessProbe:
          httpGet:
            path: /
            port: 80
            scheme: HTTP
          initialDelaySeconds: 30
          timeoutSeconds: 5
          periodSeconds: 30
          successThreshold: 1
          failureThreshold: 5
        readinessProbe:
          httpGet:
            path: /
            port: 80
            scheme: HTTP
          initialDelaySeconds: 30
          timeoutSeconds: 5
          periodSeconds: 10
          successThreshold: 1
          failureThreshold: 5
        ports:
          - name: http
            containerPort: 80
            protocol: TCP
上面定义的资源对象中,最重要的就是Service 中 label selector的定义:
  selector:
    app: demo
    version: v1
部署与测试
部署v1 v2 deploy服务 和 service服务
$ kubectl apply -f service.yaml -f v1-deploy.yaml -f v2-deploy.yaml
测试流量是否到v1版本
# 登陆任意一个pod,向 demo service 发起请求
$ while sleep 0.3; do curl http://demo; done

# 输出日志
Host: demo1-deployment-b5bd596d8-dw27b, Version: v1
Host: demo1-deployment-b5bd596d8-dw27b, Version: v1
切换入口流量从v1 到 v2
$ kubectl patch service demo -p '{"spec":{"selector":{"version":"v2"}}}'
测试流量是否到v2版本
# 登陆任意一个pod,向 demo service 发起请求
$ while sleep 0.3; do curl http://demo; done

# 输出日志
Host: demo2-deployment-b5bd596d8-dw27b, Version: v2
Host: demo2-deployment-b5bd596d8-dw27b, Version: v2
金丝雀
什么是金丝雀发布?
金丝雀发布(Canary):也是一种发布策略,和国内常说的灰度发布是同一类策略。蓝绿部署是准备两套系统,在两套系统之间进行切换,金丝雀策略是只有一套系统,逐渐替换这套系统。
Istio 金丝雀部署
定义 service 服务
apiVersion: v1
kind: Service
metadata:
  name: demo4
  namespace: test1
  labels:
    app: demo4
spec:
  ports:
    - port: 80
      targetPort: http
      protocol: TCP
      name: http
  selector:
    app: demo4
定义两个版本的 deploy 文件,两个版本都包含服务选择标签 app:demo4
apiVersion: apps/v1beta1
kind: Deployment
metadata:
  name: demo4-deployment-v1
  namespace: test1
spec:
  replicas: 1
  template:
    metadata:
      annotations:
        # 允许注入 sidecar
        sidecar.istio.io/inject: "true"
      labels:
        app: demo4
        version: v1
    spec:
      containers:
      - name: demo4-v1
        image: mritd/demo
        livenessProbe:
          httpGet:
            path: /
            port: 80
            scheme: HTTP
          initialDelaySeconds: 30
          timeoutSeconds: 5
          periodSeconds: 10
          successThreshold: 1
          failureThreshold: 5
        readinessProbe:
          httpGet:
            path: /
            port: 80
            scheme: HTTP
          initialDelaySeconds: 30
          timeoutSeconds: 5
          periodSeconds: 10
          successThreshold: 1
          failureThreshold: 5
        ports:
          - name: http
            containerPort: 80
            protocol: TCP

---

apiVersion: apps/v1beta1
kind: Deployment
metadata:
  name: demo4-deployment-v2
  namespace: test1
spec:
  replicas: 1
  template:
    metadata:
      labels:
        app: demo4
        version: v2
      annotations:
        sidecar.istio.io/inject: "true"
    spec:
      containers:
      - name: demo4-v2
        image: mritd/demo
        livenessProbe:
          httpGet:
            path: /
            port: 80
            scheme: HTTP
          initialDelaySeconds: 30
          timeoutSeconds: 5
          periodSeconds: 10
          successThreshold: 1
          failureThreshold: 5
        readinessProbe:
          httpGet:
            path: /
            port: 80
            scheme: HTTP
          initialDelaySeconds: 30
          timeoutSeconds: 5
          periodSeconds: 10
          successThreshold: 1
          failureThreshold: 5
        ports:
          - name: http
            containerPort: 80
            protocol: TCP
上面定义和普通k8s定义蓝绿部署是一样的
设置路由规则来控制流量分配。如将 10% 的流量发送到金丝雀版本(v2)。后面可以渐渐的把所有流量都切到金丝雀版本(v2),只需要修改weight: 10参数,注意v1和v2版本和一定要等于100
apiVersion: networking.istio.io/v1alpha3
kind: VirtualService
metadata:
  name: demo4-vs
  namespace: test1
spec:
  hosts:
  - demo4.a.com
  gateways:
  - demo4-gateway
  http:
  - route:
    - destination:
        host: demo4.test1.svc.cluster.local
        subset: v1
      weight: 90
    - destination:
        host: demo4.test1.svc.cluster.local
        subset: v2
      weight: 10

---

apiVersion: networking.istio.io/v1alpha3
kind: DestinationRule
metadata:
  name: demo4
  namespace: test1
spec:
  host: demo4.test1.svc.cluster.local
  subsets:
  - name: v1
    labels:
      version: v1
  - name: v2
    labels:
      version: v2
当规则设置生效后,Istio 将确保只有 10% 的请求发送到金丝雀版本,无论每个版本的运行副本数量是多少。
高层次的金丝雀部署
只允许特定网站上50%的用户流量路由到金丝雀(v2)版本,而其他用户则不受影响
apiVersion: networking.istio.io/v1alpha3
kind: VirtualService
metadata:
  name: demo4-vs
  namespace: test1
spec:
  hosts:
  - demo4.a.com
  gateways:
  - demo4-gateway
  http:
  - match:
    - headers:
        cookie:
          regex: "^(.*?;)?(email=[^;]*@some-company-name.com)(;.*)?$"
    route:
    - destination:
        host: demo4.test1.svc.cluster.local
        subset: v1
        weight: 50
    - destination:
        host: demo4.test1.svc.cluster.local
        subset: v2
        weight: 50
  - route:
    - destination:
        host: demo4.test1.svc.cluster.local
        subset: v1
VirtualService 与 DestinationRule 解释
- Istio Virtual Service,用于控制当前deployment和金丝雀deployment流量分配的权重
- Istio Destination Rule,包含当前deployment和金丝雀deployment的子集(subset)
- Istio Gateway(可选),如果服务需要从容器集群外被访问则需要搭建gateway
参考
https://archive.istio.io/v1.2/zh/docs/tasks/traffic-management/request-routing/
https://archive.istio.io/v1.2/zh/blog/2017/0.1-canary/